Extended Side Angle aka Utthita Parsvakonasana is a common posture usually incorporated in the standing sequence of a Vinyasa or Ashtanga class. Lengthening of the side body is crucial in this pose so make sure to be mindful of that when practicing it!
Pose Summary
Steps
Step 1
Begin in Tadasana (Mountain Pose) with your feet together and arms alongside your body. Distribute the weight evenly in your feet.
Step 2
On an exhale, step your left leg about 4 to 5 feet in back of you and turn that back foot at about a 80 degrees angle. You want the front heel to be aligned with the arch of the back foot.
Step 3
Bend the right (front) knee to 90 degrees so that the knee is directly over the ankle and the shin is perpendicular to the earth. The knee should be tracking over the second and third toe. Distribute the weight evenly through the front foot as you lift the inner arch and root down through the corners of the feet. The front toes are pointed forwards and are parallel with the front edge of your mat.
Step 4
Engage the quad of the back leg. The leg should be straight without locking out the knee. Root down the outer edge (pinky toe side) of the back foot into the earth as you press into the big toe mound.
Step 5
The hips are facing the length of your mat and bring a gentle engagement to your belly by drawing the navel in and up towards the spine. Lengthen your tailbone down towards the earth.
Step 6
On an inhale, lift the arms to shoulder height, palms face down towards the ground. Relax the shoulders away from the ears and reach through your fingertips. This is Warrior II.
Step 7
On an exhale, lower your right forearm to the right thigh and extend the left arm up towards the sky. This is variation 1 with the extended arm.
Step 8
Plug the left arm bone into its socket and extend the arm above your head. This is variation 2 with the extended arm. The bicep is directly above the left ear and the fingertips are actively reaching forwards. Bring your gaze under the extended arm.
Step 9
Use the core muscles to hold you in this position rather than dumping the weight into your right forearm.
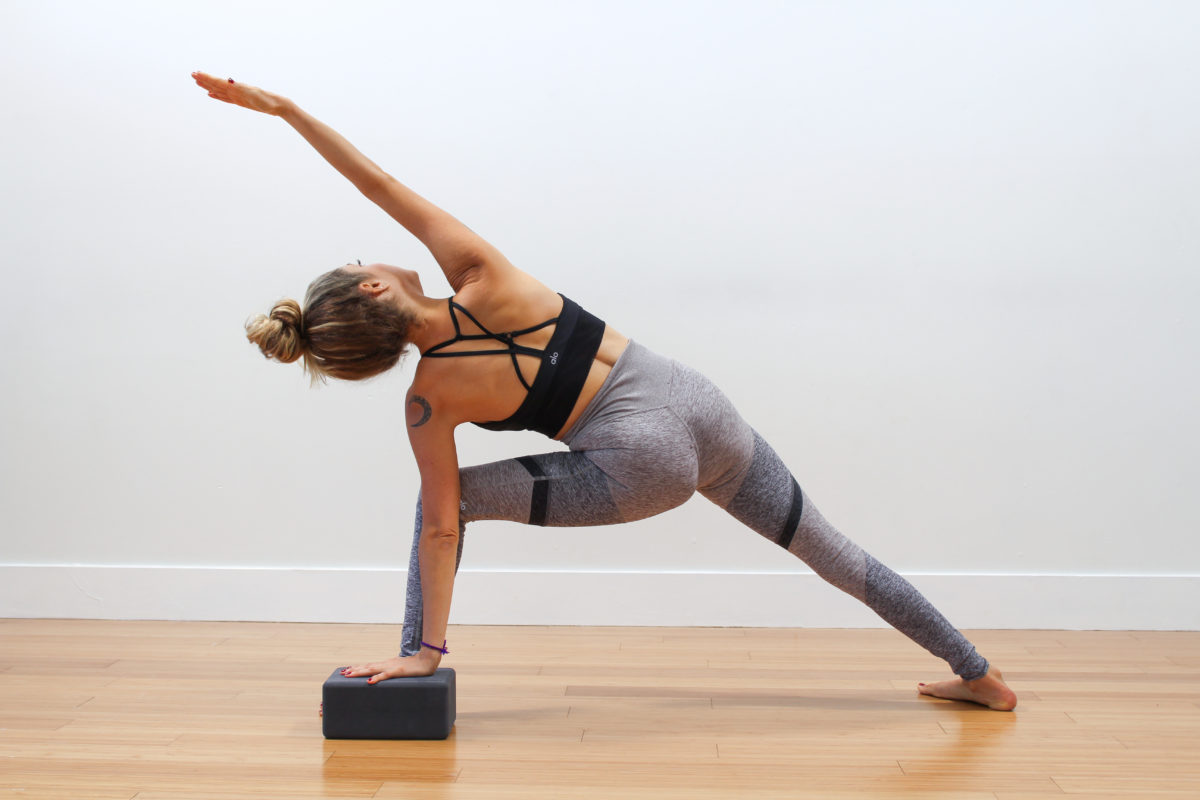
Step 10
If you would like to go a little deeper in this posture you can bring your right fingertips or palm to the inside or outside of the right foot. You can also use a block here to elevate the earth. All of these arm variations work so try them all out and see which one feels best in your body.
**Note: Many practitioners are too enamored with wanting to get their hand to the ground. Unless you have really long arms this will most likely compromise the alignment of your spine and block the energetic lines and benefits of the posture. Use the block, fingertips or elbow on thigh variations to keep a long, straight spine and a clean line of energy from your back heel through the crown of your head. Do you notice the difference?
Step 11
Ensure that the right knee is not splaying outwards or dropping in. Stay grounded through both feet.
Step 12
To get out of the posture, use the strength of your core to come back to warrior 2, straighten the front leg, lower the arms and step back to mountain pose. Repeat on the left side
Benefits
- Stretches groin, hamstrings, shoulders and back
- Tones core muscles, legs, knees and ankles
- Therapeutic for constipation, infertility, sciatica, menstrual discomfort, and low back pain
Contraindications
- Headaches
- Insomnia
- High or low blood pressure
- Neck injury keep the gaze forwards instead of upwards